A concrete footing calculator needs the correct shape: strip footings and cylindrical piers use different volume formulas. Measure the inside dimensions of the forms or excavated hole. Use approved drawings for footing size, depth and reinforcement; a quantity calculation cannot decide whether a footing is structurally adequate.
Use this concrete footing calculator guide to estimate strip footings, round piers and post holes, with seven checks that keep dimensions, geometry and orders consistent.
Rectangular strip footing formula
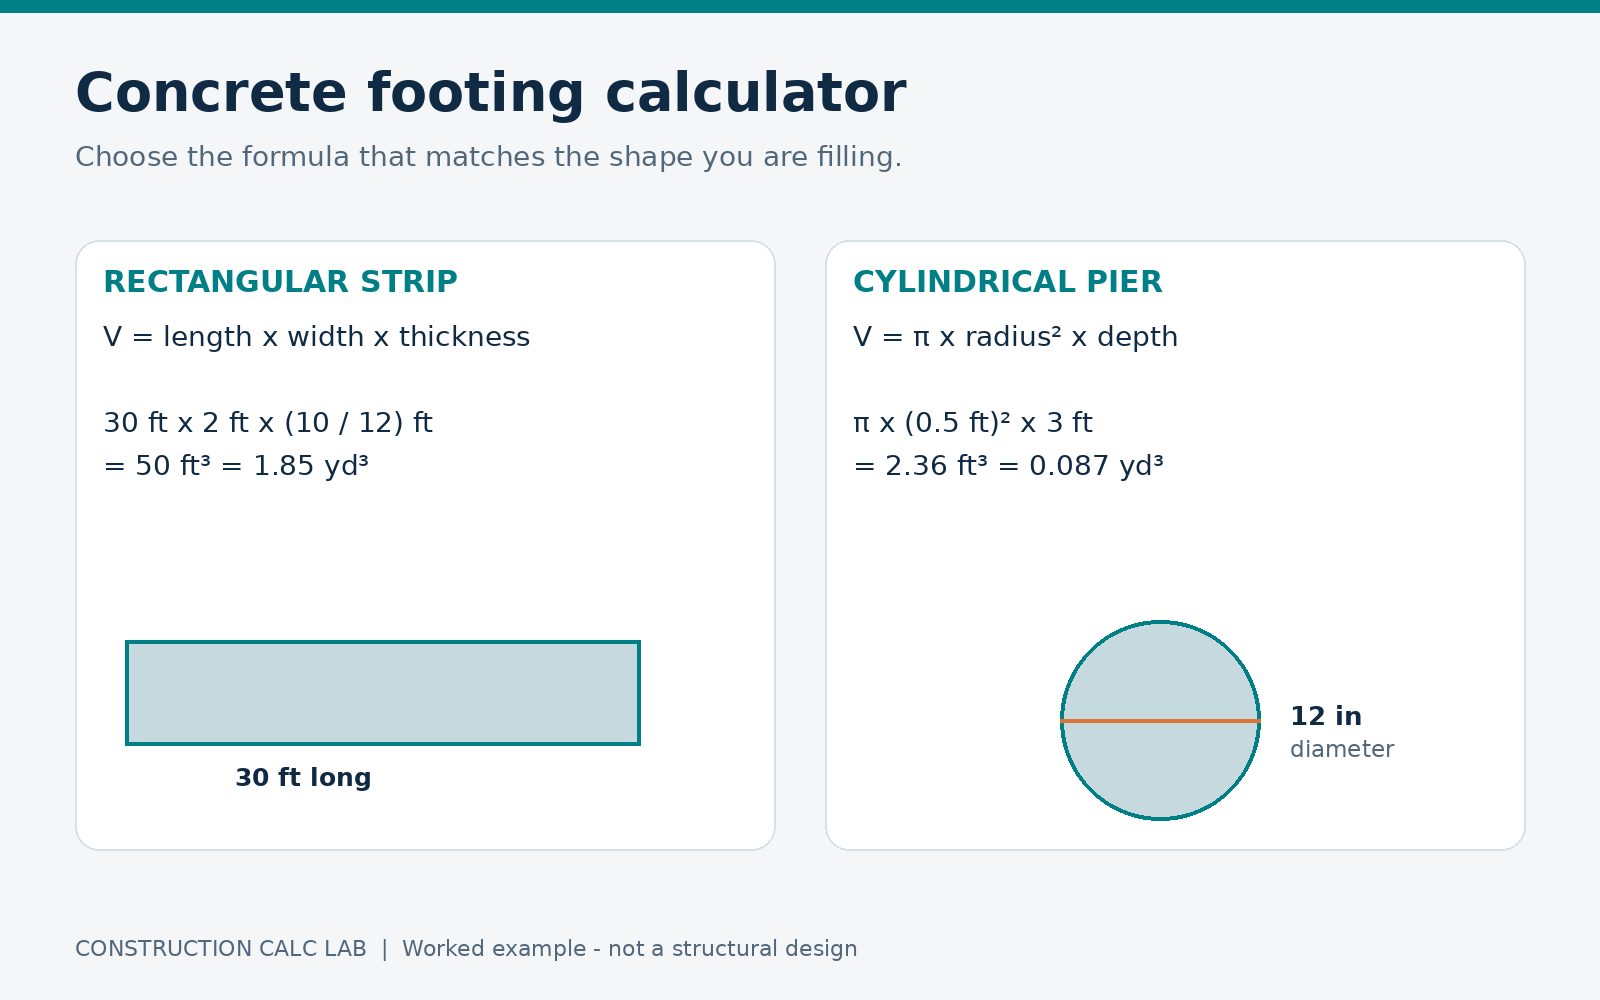
Volume (ft³) = length (ft) × width (ft) × depth (ft). Divide by 27 for cubic yards. If depth is given in inches, divide it by 12 first.
Example: a 30 ft long, 2 ft wide footing at 10 in deep uses 30 × 2 × (10 ÷ 12) = 50 ft³, equal to 1.85 yd³ nominal. If two runs overlap at a corner, subtract the overlapping volume once.
| Strip footing | Volume for 100 linear ft |
|---|---|
| 12 in wide × 8 in deep | 66.67 ft³ = 2.47 yd³ |
| 16 in wide × 8 in deep | 88.89 ft³ = 3.29 yd³ |
| 20 in wide × 10 in deep | 138.89 ft³ = 5.14 yd³ |

Round post hole or cylindrical pier
Volume (ft³) = π × (diameter in ft ÷ 2)² × depth in ft. A 12 in diameter hole that is 3 ft deep holds π × 0.5² × 3 = 2.36 ft³, or 0.087 yd³. Ten identical holes hold about 23.56 ft³ = 0.87 yd³ before allowances. For bags, divide the required cubic feet by the bag’s stated yield, then round up to whole bags; yields vary by product.
Bell bottoms, steps and uneven excavation
A widened base is not a uniform cylinder. Calculate its geometry separately according to the approved design and add it to the straight pier volume. For stepped footings, calculate each rectangular segment and sum only the non-overlapping parts. Over-excavation changes the actual fill volume, so remeasure before ordering.
Ordering checklist
- Confirm all dimensions and units on site.
- Check whether the forms or the soil set the actual width.
- Add a measured or justified allowance for leakage and uneven excavation.
- Ask the supplier about minimum loads, short-load charges and mix requirements.
- Keep reinforcement quantities separate from concrete volume.
Cross-check the result with the Construction Calc Lab calculator. For footing depth, reinforcement and bearing requirements, follow the engineer’s drawings and local rules.
7 reliable concrete footing calculator checks
1. Read the footing schedule first
Before using a concrete footing calculator, gather the approved foundation drawings and footing schedule. Identify the width, thickness, length and shape of every footing type. Do not infer a structural dimension from the amount of concrete you would prefer to order. The calculator estimates material for a defined geometry; it does not determine soil bearing capacity, frost protection, reinforcement or load resistance.
Label each concrete footing calculator entry with its footing type and drawing reference. A perimeter strip, an isolated pad and a cylindrical pier may require different dimensions and separate quantities. If the drawings have been revised, use the latest approved version and record its date. Working from two versions of the plan is a common way to omit or duplicate a foundation element.
2. Distinguish thickness from founding depth
The depth below ground to the bottom of a footing is not necessarily the thickness of the concrete footing. For example, an excavation can extend below ground while the concrete strip occupies only part of its height. Enter the actual concrete thickness in the rectangular volume formula. Include a foundation wall or pier above it as a separate element when required.
This distinction is essential when using a concrete footing calculator. If you enter the full excavation depth as concrete thickness, the result can be much too large. Conversely, using only footing thickness for a pier that fills a deep hole can understate the volume. Sketch a simple section showing what is concrete and what is soil, fill or void.
3. Convert dimensions before multiplying
For an imperial concrete footing calculator, convert inches to feet by dividing by 12. A 16 in width becomes 1.3333 ft, and an 8 in thickness becomes 0.6667 ft. Retain the fractions or sufficient decimal places. For a metric calculation, convert millimetres to metres by dividing by 1,000, then multiply the dimensions to obtain cubic metres.
4. Measure actual formed or excavated dimensions
If concrete is placed between forms, measure the clear space inside those forms. If the excavation itself defines the sides, verify the excavation width and shape. Soil that breaks away or an uneven trench bottom changes the fill volume. Correct these measured dimensions before selecting an allowance; an allowance should not conceal a known difference from the design geometry.
5. Handle corners and intersections once
Where two strip footings intersect, their rectangular volumes may overlap. A centerline takeoff can be valid when used consistently with the appropriate geometry, but mixing centerline lengths with outside lengths can produce errors. Divide the foundation into non-overlapping pieces on a sketch, or use a clear and documented intersection deduction method.
For example, two full rectangular strips crossing each other share an intersection block. If that shared block is 2 ft × 2 ft × 1 ft, it contains 4 ft³. When both strip calculations include the entire block, subtract 4 ft³ once from their sum. Do not subtract it twice, and do not assume every corner has the same overlap.
6. Separate nominal volume and ordering allowance
Record the concrete footing calculator’s nominal result before adding extra material. Then label the allowance and explain its basis. If the site is well formed and uniform, its uncertainty differs from a rough excavation. Agree on the allowance with the responsible contractor and supplier, and make sure the supplier’s rounding does not get counted as a second full allowance.
7. Check delivery or bag yield
A ready-mix quote uses a volume unit, while bagged material must be converted using the product’s mixed yield. Check the label or technical data for the specific product. Also confirm that the chosen product satisfies the project specification. A concrete footing calculator can estimate the number of bags, but it cannot approve a mixture for a structural application.
Concrete footing calculator example: a foundation perimeter
Assume a rectangular foundation has outside footing dimensions of 30 × 20 ft and a uniform strip width of 2 ft. For this simplified ring geometry, the inside opening is 26 × 16 ft. The concrete plan area is the outside area minus the inside area: 600 − 416 = 184 ft². At a thickness of 1 ft, the nominal volume is 184 ft³.
Convert the volume to cubic yards: 184 ÷ 27 = 6.815 yd³. An illustrative 5% allowance gives approximately 7.156 yd³ before supplier rounding. This example avoids corner double-counting by calculating the complete ring area. It assumes a uniform rectangular ring without steps, intersecting interior footings or changes in thickness.
If the design includes an interior strip, calculate the additional area without counting the parts that already lie inside the perimeter ring. If the foundation has different widths, divide it into sections. The simplest correct geometry is better than forcing every foundation into one formula. Record the method so another estimator can reproduce the result.
Round piers: diameter matters twice
For cylindrical piers, a concrete footing calculator squares the radius, making diameter errors especially important. A 12 in diameter pier has a radius of 6 in, or 0.5 ft. For a 3 ft concrete height, its volume is π × 0.5² × 3 = 2.356 ft³. Ten identical piers require 23.562 ft³, or 0.873 yd³, before allowance.
If the diameter increases from 12 in to 14 in while the height stays the same, volume increases by the ratio 14² ÷ 12², approximately 1.361. That is about 36% more concrete, even though the diameter increased by only two inches. Measure tube or hole diameters carefully and use the actual internal diameter where forms define the volume.
For a post set into the concrete, the post displaces some material. A detailed net calculation can subtract the embedded post volume when the project method calls for it. Do not subtract the portion above the concrete or assume the nominal lumber size equals its actual dimensions. Keep this deduction separate and avoid using it to eliminate a justified site allowance.
Metric footing calculation
For a strip measuring 12 m long, 600 mm wide and 250 mm thick, first convert the cross-section dimensions to 0.60 m and 0.25 m. Multiply 12 × 0.60 × 0.25 = 1.80 m³. An illustrative 5% allowance gives 1.89 m³. Supplier increments, site conditions and the project’s order procedure determine the final quantity.
Using a metric concrete footing calculator is usually simpler than converting every metric dimension to imperial units. If a supplier needs cubic yards, convert the completed volume once. Conversely, when drawings are metric and the supplier quotes cubic metres, there is no reason to introduce a cubic-yard conversion at all.
Estimate bags using product yield
Suppose a small non-overlapping group of holes requires 8.40 ft³ after a chosen allowance. If the selected concrete product has a stated yield of 0.60 ft³ per bag, the calculation is 8.40 ÷ 0.60 = 14 bags. If the required volume were 8.50 ft³, the result would be 14.167 bags, so the purchase quantity would round up to 15 whole bags.
The 0.60 ft³ yield is an assumption for this example. Read the actual product data before ordering, and follow its mixing instructions. The QUIKRETE Concrete Mix product page links to technical information for one commonly available bagged mix. Other products and package sizes may have different yields.
After checking the concrete footing calculator result, consider whether the crew and mixer can place that amount efficiently. A bag count that looks manageable on a worksheet may involve substantial transport and mixing. Compare the complete method, including handling and delivery, before choosing between bags and ready-mix. Keep the choice consistent with the specified mix and placement requirements.
Mistakes a concrete footing calculator cannot detect
A concrete footing calculator cannot know that a measurement came from an outdated drawing, that a trench has been widened on site or that two entered lengths overlap. It will generally multiply the values exactly as supplied. This is why a marked sketch and a brief field check are as important as the calculation itself.
It also cannot distinguish concrete from blinding, drainage stone or backfill unless those items are entered separately. Label each material clearly in the quantity schedule. If a foundation detail includes several layers, assign each layer its own area, thickness and unit. That makes it easier to order the correct material and compare the contractor’s takeoff with yours.
For further checking, compare the result with the general concrete quantity guide. If the footing connects to a floor slab, use the floor slab guide for the separate slab quantity. Do not combine unrelated measurements merely because both elements use concrete.
Check a stepped footing section by section
A stepped foundation follows changing levels, but its concrete volume still comes from the actual solid shapes. Divide the footing into sections with constant width and thickness. Record the length of each section and identify where vertical transitions add concrete. Use the detail drawing to avoid counting a step twice or overlooking the additional material at a transition.
For a simplified example with no extra transition volume, suppose one strip segment is 20 ft long and another is 15 ft long. Both are 2 ft wide and 1 ft thick. Their combined nominal volume is (20 × 2 × 1) + (15 × 2 × 1) = 70 ft³, or 2.593 yd³. Any concrete required by the actual step detail must be added separately.
The important point is to model what the drawing shows rather than assume that the elevation difference itself is a new rectangular block. If the detail is unclear, obtain clarification before finalizing the takeoff. A concrete footing calculator produces a reliable quantity only when its input geometry matches the foundation detail.
Understand the effect of excavation width
Suppose a 40 ft long footing is designed as 18 in wide and 12 in thick. Its nominal volume is 40 × 1.5 × 1 = 60 ft³, or 2.222 yd³. If an unformed excavation actually averages 21 in wide at the same concrete thickness, the fill volume becomes 40 × 1.75 × 1 = 70 ft³, or 2.593 yd³.
The width difference adds 10 ft³, approximately 16.7% above the drawing-based quantity. A small standard allowance would not necessarily cover that change. Measure and correct the base quantity first. Whether the excavation should be corrected, formed or filled according to a revised detail is a construction decision for the responsible project team.
Update the concrete footing calculator inputs with field measurements where the trench varies, and split it into representative sections when a single average would be misleading. Keep those measurements with the calculation. They explain why the material order may differ from a takeoff based only on plan dimensions and help avoid disputes about where the extra volume came from.
Prepare a footing pour record
Before ordering, retain the concrete footing calculator result with the footing references, drawing revision, allowance and final quantity. Include the placement area and scheduled date if the foundation is being poured in stages. This helps the supplier and site team distinguish one day’s order from the quantity for the entire project.
During the work, compare deliveries with the concrete footing calculator estimate and record approved changes. Keep the delivery tickets with the quantity sheet. Afterward, compare the final quantity with the measured estimate and note any scope changes or site conditions that explain the difference. This is more useful than simply labeling every additional load as waste.
For a repeated pier or footing layout, record the actual number completed in each stage. An estimate for twelve identical piers can be mathematically correct while the day’s order is wrong if only eight are ready. Clear counts and placement references keep the concrete footing calculator result connected to the work that will actually be performed.
Concrete footing calculator frequently asked questions
What depth should I enter for a strip footing?
Enter the concrete thickness shown for that footing, after converting it to the same unit as length and width. Do not automatically enter the depth from ground level to the bottom of excavation. Check the section drawing if the meaning of a dimension is unclear.
Can the same calculator handle a bell-shaped base?
Only if it explicitly supports that geometry. Otherwise, calculate the straight shaft and widened base separately using the actual shapes. Some bases resemble a truncated cone, while others use a different profile. The dimensions and shape must come from the design, not from a generic drawing.
How should I record the finished estimate?
List the footing reference, shape, dimensions, count, nominal volume, deductions, allowance and final order quantity. Attach the sketch and note any field measurements. This record is especially useful when several foundations are poured on different days or when the supplier asks you to confirm a remaining quantity.
Does a higher concrete quantity mean a stronger footing?
Quantity alone does not establish structural performance. Geometry, ground conditions, reinforcement, concrete specification and construction details all matter. Use the concrete footing calculator for the material takeoff and follow the approved design for the actual foundation. If the site differs from the design assumptions, obtain the required professional review before proceeding.
Featured photo: Ray Donnelly / Unsplash.